Build a fully local voice assistant in 2026
A practical setup for a Raspberry Pi-friendly voice assistant based on Platypush.
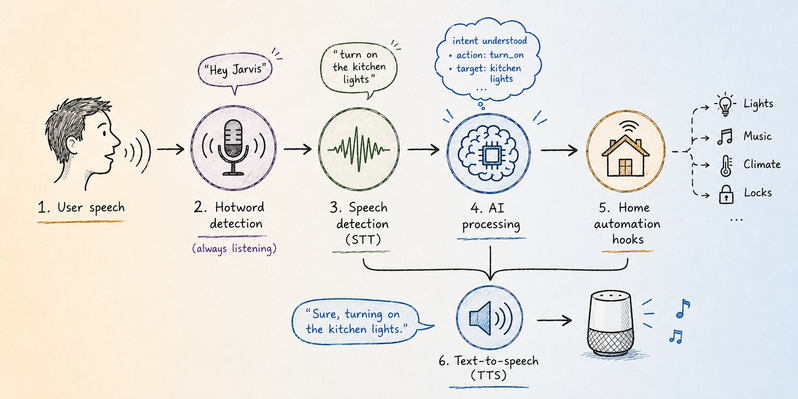
Those who have followed me for a while know of my personal obsession with self-built voice assistants.
My experiments over the years can be summarized as it follows:
-
2007: Voxifera, my very first attempt at building a primitive voice assistant using Hidden Markov models. Definitely not good for general-purpose usage, but good enough in 2007 to distinguish between a dozen of simple voice commands.
-
2019: First voice assistant built on top of Platypush. It used the now deprecated Google Assistant Library on top of a Raspberry Pi with a microphone and a speaker, and it could hook any automation routines and custom commands to it through event hooks.
-
2020: Second iteration on #platypush, this time supporting other assistant plugins too - Alexa (integration now removed), Snowboy (also removed, since the project is dead), Mozilla DeepSpeech (also removed now, since Mozilla discontinued it), PicoVoice, and mimic3 (the text-to-speech engine built on top of Mycroft, now bankrupt).
-
2024: Third iteration on Platypush, this time with an enhanced PicoVoice integration and new speech-to-text and text-to-speech plugins based on the OpenAI APIs.
But it's now 2026, and perhaps both the hardware and the software are now mature enough for fully on-device voice assistants based on fully open solutions likely to stick around for a while.
In this article we'll wire that gap closed with Platypush:
assistant.openwakewordlistens for the wake word locally.assistant.vosktranscribes the command locally.tts.piperspeaks the answer locally.openaiis used only where a language model is useful: turning messy speech into intent, or answering general questions.- Existing home automation plugins such as
light.hue,music.mpdorweather.openweathermapto provide the actions.
The result is not another cloud assistant with a different coat of paint. The hotword engine, speech recognition, command dispatch and speech synthesis can all run on-device. If the openai step points to a local OpenAI-compatible server, then the whole pipeline can stay on your LAN too.
The pipeline
The architecture can be summarized as follows:
Hotword detection ("OK Google", "Alexa" etc.) is a continuous, low-latency workload, and it should not need the network.
Speech-to-text is also a good fit for local inference: Vosk models are small enough to run on modest hardware, including Raspberry Pis, and they are perfectly adequate for short home automation commands.
Text-to-speech is another place where local models are good enough nowadays: Piper voices are fast, small and much nicer than the old robotic espeak-style fallback.
The only optional network-shaped piece is the language model.
But that is a policy choice, not a requirement of the voice stack.
Setup
Clone the assistant sample repository:
git clone https://git.platypush.tech/platypush/assistant-sample
cd assistant-sample
Models
The next step is to download the voice models used by the voice stack.
Hotword Detection
When the service starts the first time, it will automatically download all the available models.
You can then use the following command to list the available models once the service is running:
curl -s -XPOST \
     -H 'Content-type: application/json' \
     -H "Authorization: Bearer $PLATYPUSH_TOKEN" \
     -d '{"type":"request", "action":"assistant.openwakeword.list_models"}' \
     http://localhost:8008/execute
Where $PLATYPUSH_TOKEN is the token of the user that is running the service.
You can retrieve it by connecting to http://localhost:8008 when the service starts for the first time. Create your credentials, then select Settings -> Tokens -> Generate API Token.
Speech-to-text
A full list of the Vosk voice models is available here.
Some feedback about the quality of the English models:
| Model | Size | Notes |
|---|---|---|
vosk-model-small-en-us-0.15 |
40 MB | Very fast and lightweight model that can also run on an old Raspberry Pi, but accuracy can be low. |
vosk-model-en-us-0.22-lgraph |
128 MB | Reasonably accurate on clear speech and with native speakers, but still small enough to run fine even on a Raspberry Pi. |
vosk-model-en-us-0.22 |
1.8 GB | Accurate generic US English model. Fast on an laptop or x86 processor, but it may be a bit heavy on a Raspberry Pi. |
Download the selected model to the Docker volume working directory:
mkdir -p ./workdir/assistant.vosk/models
cd ./workdir/assistant.vosk/models
wget "https://alphacephei.com/vosk/models/vosk-model-en-us-0.22-lgraph.zip"
unzip "vosk-model-en-us-0.22-lgraph.zip"
rm "vosk-model-en-us-0.22-lgraph.zip"
Text-to-speech
Download a speech synthesis model from here.
Audio samples are also available to get an idea of the type of voice before downloading.
The model usually consists of a *.onnx and a *.onnx.json file. Download both of them to the Docker volume working directory:
mkdir -p ./workdir/piper_tts
cd ./workdir/piper_tts
wget "https://huggingface.co/rhasspy/piper-voices/resolve/main/en/en_US/hfc_female/medium/en_US-hfc_female-medium.onnx"
wget "https://huggingface.co/rhasspy/piper-voices/resolve/main/en/en_US/hfc_female/medium/en_US-hfc_female-medium.onnx.json"
Configuration
Copy and edit the example configuration file.
cp config/config.example.yaml config/config.yaml
Home automation plugins
The assistant becomes useful once recognized speech can reach the rest of the house.
For example, Hue lights:
light.hue:
  bridge: hue
  groups:
    - Living Room
And MPD/Mopidy for music:
music.mopidy:
  host: localhost

music.mpd:
  host: localhost
  poll_interval: null
Those are just regular Platypush plugins.
The assistant does not need special knowledge about Hue, MPD, Chromecast, Zigbee, MQTT or anything else.
It only needs to emit events; your hooks decide what to do with them.
Build
Build the container image for the assistant service:
docker build -t platypush-voice .
Run
The assistant needs access to the host microphone and speakers. The container routes ALSA through PulseAudio, so the examples below connect it to a PulseAudio server running on the host.
Linux
With PulseAudio or pipewire-pulseaudio installed:
docker run --rm \
  -e PULSE_SERVER=unix:/run/pulse/native \
  -v /run/user/$(id -u)/pulse/native:/run/pulse/native \
  --name voice-assistant \
  -p 8008:8008 \
  -v ./config:/etc/platypush \
  -v ./workdir:/var/lib/platypush \
  platypush-voice
macOS
Install and start PulseAudio on the host:
brew install pulseaudio
pulseaudio --daemonize=yes --exit-idle-time=-1
pactl load-module module-native-protocol-tcp \
  auth-anonymous=1 \
  listen=0.0.0.0 \
  port=4713
Then start the container:
docker run --rm \
  -e PULSE_SERVER=tcp:host.docker.internal:4713 \
  --name voice-assistant \
  -p 8008:8008 \
  -v "$(pwd)/config:/etc/platypush" \
  -v "$(pwd)/workdir:/var/lib/platypush" \
  platypush-voice
If pactl load-module reports that the module is already loaded, you can keep using the existing PulseAudio daemon.
Windows
Install PulseAudio for Windows, then create a default.pa file in the same directory as pulseaudio.exe:
load-module module-waveout sink_name=output source_name=input record=1
load-module module-native-protocol-tcp auth-anonymous=1 listen=0.0.0.0 port=4713
set-default-sink output
set-default-source input
Start PulseAudio from PowerShell:
.\pulseaudio.exe -F .\default.pa --exit-idle-time=-1
Then start the container from the repository directory:
docker run --rm `
  -e PULSE_SERVER=tcp:host.docker.internal:4713 `
  --name voice-assistant `
  -p 8008:8008 `
  -v "${PWD}/config:/etc/platypush" `
  -v "${PWD}/workdir:/var/lib/platypush" `
  platypush-voice
Make sure microphone access is enabled for desktop applications under Windows privacy settings, and allow PulseAudio through the firewall if prompted.
Usage
Once the service is running, you can start interact with it with voice commands (the default activation word is "Alexa").
Any questions about the weather will be resolved by the weather plugin if it's been enabled.
If the music or lights plugins are enabled, they can be controlled with voice commands ("stop the music", "turn on the lights", etc.)
Otherwise, the assistant will use the openai plugin to respond to your questions, with follow-up turns when the response from OpenAI is also a question.
Extending the Assistant
The assistant logic is modeled through simple Platypush hooks under config/scripts.
You can extend it as you like by defining your own hooks or modifying the existing ones.
Starting a conversation
Conversations are started by hooking to the HotwordDetectedEvent.
import logging

from platypush import run, when
from platypush.events.assistant import HotwordDetectedEvent

logger = logging.getLogger(__name__)
ai_plugin = "openai"
assistant_plugin = "assistant.vosk"


@when(HotwordDetectedEvent)
def on_hotword_detected(event: HotwordDetectedEvent):
    """
    When the hotword is detected, start a conversation.
    """
    logger.info(f"Hotword {event.hotword} detected")
    run(f"{assistant_plugin}.start_conversation")
Deterministic commands
For common home automation commands, regular event hooks are still the best tool. They are fast, inspectable, and they do not hallucinate.
from platypush import run, when
from platypush.events.assistant import SpeechRecognizedEvent


@when(SpeechRecognizedEvent, phrase="turn on (the)? lights")
def turn_on_lights():
    """
    Hook run when the user says "turn on the lights" (regex)
    """
    run("light.hue.on")


@when(SpeechRecognizedEvent, phrase="play (the)? music")
def play_music():
    """
    Hook run when the user says "play the music" (regex)
    """
    run("music.mpd.play")


@when(SpeechRecognizedEvent, phrase="set the music volume (to|on|at) ${volume}")
def set_volume(volume: int):
    """
    Hook run when the user says "set the music volume to ${volume}"
    (regex with parameter).
    """
    run("music.mpd.set_volume", volume=volume)
AI Commands
If the openai plugin is enabled, you can use it to help you answer questions.
There are two generic use-cases for voice assistants where an AI plugin is beneficial:
- Speech to Intent
- Response fallback
Speech to Intent
You may want this for general questions, for commands that do not fit a neat regular expression, or for transforming a raw sentence such as:
make it a bit darker and reduce the music volume
into a structured action plan like.
[
  {
    "action": "light.hue.set_lights",
    "args": {
      "bri": 50
    }
  },
  {
    "action": "music.mpd.set_volume",
    "args": {
      "volume": 20
    }
  }
]
An example provided in the assistant sample is that of weather forecasting.
Note in particular the usage of openai.get_response with a well crafted system prompt that turns a natural language request like:
What's the weather tomorrow in San Francisco?
Into:
{
  "type": "weather",
  "delta_days": 1,
  "location": "San Francisco"
}
def parse_weather_request(request: str) -> WeatherRequest | None:
    request_dict = (
        run(
            "openai.get_response",
            context=[
                {
                    "role": "system",
                    "content": (
                        "You are a voice assistant provided with weather requests as free text.\n"
                        "Given the prompt, return a structured JSON representation of the request in the following format: "
                        '{ "type": "weather", "delta_days": 1, "location": "San Francisco" }, '
                        'where both delta_days and location are optional (e.g. if the user simply asks "How\'s the weather?".\n'
                        'If the prompt doesn\'t seem to contain a weather request, return { "type": null }'
                    ),
                }
            ],
            prompt=request,
        )
        or {}
    )

    if request_dict.get("type") != "weather":
        return None

    weather_request = WeatherRequest(
        location=request_dict.get("location", default_location),
        delta_days=request_dict.get("delta_days", 0),
    )

    return weather_request
You can also use the model for intermediate transformation instead of direct answers. For example, ask it to return a tiny JSON object with action and args, then dispatch only actions you explicitly allow:
ALLOWED_ACTIONS = {
    "lights.on": "light.hue.on",
    "lights.off": "light.hue.off",
    "music.play": "music.mpd.play",
    "music.stop": "music.mpd.stop",
}


@when(SpeechRecognizedEvent)
def on_fuzzy_command(event):
    plan = run(
        "openai.get_response",
        prompt=event.phrase,
        context=[
            {
                "role": "system",
                "content": (
                    "Map the user command to JSON only: "
                    '{"action": "...", "args": {...}}. '
                    f"Allowed actions: {', '.join(ALLOWED_ACTIONS)}. "
                    "If none match, return {\"action\": null, \"args\": {}}."
                ),
            }
        ],
    )

    # Parse `plan` as JSON here, validate it, then run only an allow-listed action.
That last validation step matters. A model may be useful for interpretation, but it should not get arbitrary access to run().
Response fallback
If a request doesn't match any of the commands you have defined, you can use a generic SpeechRecognizedEvent hook to forward the request to an AI plugin, and render the response as speech through the text-to-speech plugin.
import logging

from platypush import run, when
from platypush.events.assistant import SpeechRecognizedEvent

logger = logging.getLogger(__name__)
ai_plugin = "openai"
assistant_plugin = "assistant.vosk"


@when(SpeechRecognizedEvent, plugin=assistant_plugin)
def on_speech_recognized(event: SpeechRecognizedEvent):
    """
    Generic handler for speech recognition events received
    by the configured assistant plugin.
    """
    logger.info("Recognized speech: %s", event.phrase)

    # Forward the request to OpenAI and render the response as speech
    response = run(
        f"{ai_plugin}.get_response",
        prompt=event.phrase,
        context=[
            {
                "role": "system",
                "content": (
                    "You are a voice assistant that can answer questions and perform actions. "
                    "Keep in mind that prompts are transcriptions of user speech and they may "
                    "contain misspellings or errors. Try and interpret them as best as possible. "
                    "When possible, keep your answers short and concise."
                ),
            }
        ],
    )

    # If the response is not empty, render it using the TTS plugin
    if response:
        event.assistant.render_response(response)
When a response from the LLM ends with a question mark, the assistant will automatically listen for a follow-up command and fire a new SpeechRecognizedEvent.
Pausing music while listening
One nice touch is to pause the music when a conversation starts and resume it after the assistant is done.
from platypush import run, when
from platypush.events.assistant import (
    ConversationEndEvent,
    ConversationStartEvent,
)


@when(ConversationStartEvent)
def on_conversation_start():
    try:
        run("utils.clear_timeout", name="ConversationEndTimeout")
    except Exception as e:
        logger.error("Error clearing conversation end timeout: %s", e)

    run("music.mpd.pause_if_playing")


@when(ConversationEndEvent)
def on_conversation_end():
    run(
        "utils.set_timeout",
        name="ConversationEndTimeout",
        seconds=5,
        actions=[{"action": "music.mpd.play_if_paused"}],
    )
That makes the interaction feel much less clumsy: wake word, music ducks or pauses, command is recognized, answer is spoken, music resumes a few seconds later.
Going fully local
With the configuration above, hotword detection, speech-to-text, automation and text-to-speech are already local. The only non-local component is the openai plugin, if it points to OpenAI's servers.
To make the last step local too, run a model server that exposes an OpenAI-compatible API. Ollama, llama.cpp server, vLLM and LocalAI can all expose some version of /v1/chat/completions.
For example, with Ollama:
ollama pull llama3.1:8b
ollama serve
The OpenAI-compatible endpoint is then usually available at:
http://127.0.0.1:11434/v1/chat/completions
If your Platypush openai plugin version supports a custom API base URL, the configuration is the whole change:
openai:
  model: llama3.1:8b
  base_url: http://127.0.0.1:11434/v1
If it does not, keep the rest of the assistant exactly the same and replace only the fallback action with a tiny local request:
That is enough to turn the assistant into a fully local stack:
On a Raspberry Pi, I would still keep expectations realistic. Hotword detection, Vosk and Piper are fine on small machines. Local LLMs are the heavy piece. A Pi 5 with enough RAM can run small quantized models, but latency will not feel like a cloud model or a GPU-backed workstation. For many home automation workflows, that is acceptable because the LLM is only the fallback; the frequent commands stay deterministic.
Why this architecture ages well
Voice assistants have been a graveyard of abandoned SDKs and cloud products. Snowboy is gone. Mycroft is gone. The old Google Assistant SDK is deprecated. Vendor assistants are increasingly shaped around vendor ecosystems rather than user-controlled automation.
The safer long-term bet is not one monolithic assistant. It is a pipeline of small replaceable parts:
- Swap the hotword model without touching the automation logic.
- Swap Vosk for another STT engine without touching Hue or MPD.
- Swap OpenAI for a local OpenAI-compatible model without touching the wake word, TTS or command hooks.
- Swap Piper voices without touching the assistant flow.
Platypush is a good fit for this because its event system is already the boundary between perception and action. Speech recognition emits an event. Hooks decide what to do. Plugins execute the actions.
That separation is what makes the assistant inspectable. It is also what makes it possible to keep most of it on a Raspberry Pi in your house, instead of outsourcing the entire audio loop to a cloud service that may disappear, get worse, or decide one day that your use case is no longer part of the roadmap.
Final notes
The minimal version of this setup is small:
assistant.openwakewordfor the always-on wake word.assistant.voskfor local command transcription.- A few
@when(SpeechRecognizedEvent, phrase=...)hooks for deterministic commands. light.hue,music.mpdor any other Platypush plugin for actions.tts.piperfor local spoken responses.openai.get_responseonly where language understanding is worth the cost.
Start with the deterministic commands. Add the model fallback later. That way the assistant stays fast for the commands you use every day, while still being flexible enough to answer questions or interpret messy speech when you need it.
Reactions
How to interact with this page
Webmentions
To interact via Webmentions, send an activity that references this URL from a platform that supports Webmentions, such as Lemmy, WordPress with Webmention plugins, or any IndieWeb-compatible site.
ActivityPub
- Follow @blog@platypush.tech on your ActivityPub platform (e.g. Mastodon, Misskey, Pleroma, Lemmy).
- Mention @blog@platypush.tech in a post to feature on the Guestbook.
- Search for this URL on your instance to find and interact with the post.
- Like, boost, quote, or reply to the post to feature your activity here.

#weather apps are one of those things that nowadays we take for granted, and most of us consider a largely solved problem.
After all, a weather app mostly consists in a simple UI that fetches the weather conditions from some API, optionally by retrieving your current location, and then it displays the information to the user.
Optionally, it can provide little perks like weather notifications.
The average usual app is simple and boring, and it's usually nothing that a decent student at the last year of engineering college wouldn't be able to put together in a weekend.
And yet, because of how easy it is to build a simple weather app, how pervasive these apps are on everyone's phones, and the amount of data that they collect about the user (which vastly justifies the small development cost), weather apps have become a favourite vector for tracking users.
They are also favourite ads delivery instruments.
The American government itself uses weather apps to track its citizens, and ICE buys data from weather apps to track potential targets.
After all, weather apps are among the few apps that:
- Are easy to build and deploy
- Are usually installed by everyone who has a phone
- Continuously collect location data about users
What if it could be different?
Of course, there are many weather apps on F-Droid that actually do a decent job respecting users' privacy, and if you want something simple that only runs on your phone many of them may match your needs. But in my opinion that only solves part of the problem.
Those apps still need to be installed on each of your mobile or tablet devices. And on desktop you'll need a different service anyway.
And any weather notifications will be limited to the mobile device that receives them, which limits what you can do with them - what if I want to use my weather app to record all the weather measurements in a certain area? What if I also want to send a message on my family's messaging group if it starts snowing in my area?
This is where a weather solution based on Platypush comes handy.
Pros:
-
Fully self-hosted. Run the #platypush service on any device that can run a #python interpreter, from a cheap VPS to a RaspberryPi, expose it over an HTTPS URL, and any device can use the app.
-
No mobile apps required. Platypush provides a Progressive Web Application (PWA), which means that you can open the Web interface from your browser, install the PWA directly from your browser, and have it on your home screen just like a native app.
-
Full control over weather notifications. Weather updates are handled as standard Platypush events, which means that you can write your own custom hooks to deliver notifications, store weather measurements, send notifications over other channels, and so on.
Getting started
The first step is to get an OpenWeatherMap API key.
Then create a simple configuration for Platypush under /your/platypush/config/config.yaml:
backend.http:
    port: 8008

# Enable the OpenWeatherMap plugin
weather.openweathermap:
    token: YOUR_OPENWEATHERMAP_API_KEY
    # Specify a location by name
    location: Amsterdam,NL
    # Or by coordinates
    # lat: 52.372829
    # long: 4.893680

    # How often the plugin should check for new data, in seconds
    poll_interval: 300

    # metric or imperial units
    # units: metric
Then install Platypush, or run it directly through the Docker image:
docker run --rm \
    --name platypush \
    -p 8008:8008 \
    -v /your/platypush/config:/etc/platypush \
    -v /your/platypush/data:/var/lib/platypush \
    -e PLATYPUSH_DEVICE_ID=WeatherApp \
    quay.io/platypush/platypush
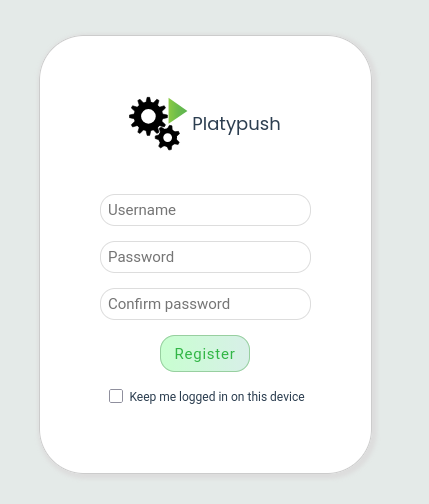
Once started, you can open the Web interface at http://localhost:8008 to register your user.
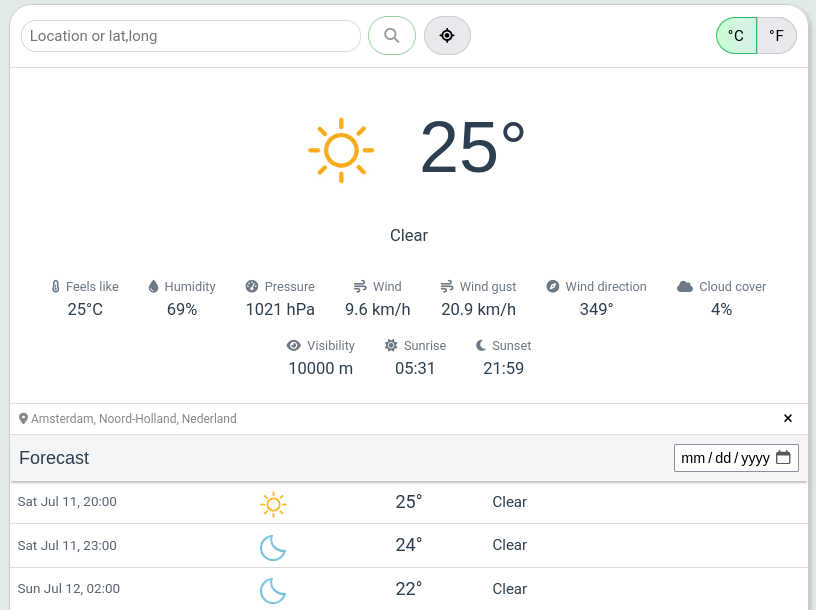
Once logged in, you can click on the weather.openweathermap tab from the left menu to immediately access your weather forecast:
HTTPS configuration
A PWA requires an HTTPS connection, or the Web service to be installed on localhost.
The localhost installation of Platypush is also possible on Android via Termux, but it's out of the scope of this article.
We can use a reverse proxy and Certbot to make the Web interface available at e.g. https://weather.platypush.example.com:
This requires:
- A registered domain name (e.g.
weather.platypush.example.com) - A box with a public IP (e.g. a VPS)
- A reverse proxy (e.g. nginx) installed on the box
- Certbot installed on the box to generate and maintain the SSL certificate
[Optional] Set up a VPN for the reverse proxy
This step is optional.
You can also run the Platypush weather service on the same box as the reverse proxy, and in such cases you don't need to set up a VPN for the reverse proxy.
If your Platypush service runs on the same machine as the reverse proxy, you can skip to Reverse proxy configuration.
Otherwise, It's recommended if you want your reverse proxy to tunnel HTTP requests to e.g. your RaspberryPi or old Android tablet at home that runs the Platypush service, without exposing those IP addresses directly to the Internet.
A quick solution involves setting up your machine with a public IP to also run a Wireguard tunnel to your local machine, so the reverse proxy can directly access your local Platypush installation without leaking your own IP to the Internet.
Server configuration
A common set up, if your machine runs Linux with systemd, involves using the wg-quick utility to create a Wireguard tunnel, and then setting up a systemd service to start the tunnel at boot time.
wg-quick is usually provided by the wireguard-tools package on most of the UNIX-like installations.
Wireguard peers authenticate each other through public keys. In this example:
- The VPS/reverse proxy gets the VPN address
10.0.0.1. - The Platypush machine gets the VPN address
10.0.0.2. - The server only accepts one client, the one whose public key is listed in the server's
[Peer]section.
Start by generating the server keypair on the VPS:
sudo install -d -m 700 /etc/wireguard

# Generate the server key
wg genkey | sudo tee /etc/wireguard/private.key > /dev/null
sudo chmod 600 /etc/wireguard/private.key

# Generate a public key
sudo cat /etc/wireguard/private.key | wg pubkey | sudo tee /etc/wireguard/public.key

# Print this value. You will need it in the client configuration.
sudo cat /etc/wireguard/public.key
Then generate the client keypair on the Platypush machine:
sudo install -d -m 700 /etc/wireguard

# Generate the client key
wg genkey | sudo tee /etc/wireguard/private.key > /dev/null
sudo chmod 600 /etc/wireguard/private.key

# Generate a public key
sudo cat /etc/wireguard/private.key | wg pubkey | sudo tee /etc/wireguard/public.key

# Print this value. You will need it in the server configuration.
sudo cat /etc/wireguard/public.key
Now go back to the VPS and create the Wireguard server configuration.
Replace <The public key of the client> with the public key printed by the Platypush machine in the previous step:
CLIENT_PUBLIC_KEY="<The public key of the client>"
SERVER_PRIVATE_KEY="$(sudo cat /etc/wireguard/private.key)"

sudo tee /etc/wireguard/wg0.conf > /dev/null <<EOF
[Interface]
PrivateKey = ${SERVER_PRIVATE_KEY}
Address = 10.0.0.1/32
ListenPort = 9929

[Peer]
PublicKey = ${CLIENT_PUBLIC_KEY}
AllowedIPs = 10.0.0.2/32
EOF

unset SERVER_PRIVATE_KEY
sudo chmod 600 /etc/wireguard/wg0.conf
The AllowedIPs = 10.0.0.2/32 line is important: it tells Wireguard that only the peer with the configured client public key is allowed to use the 10.0.0.2 tunnel address. Unknown clients, or clients with a different private key, won't be able to complete the tunnel handshake.
If your VPS firewall blocks inbound traffic by default, allow the Wireguard UDP port. For example, with ufw:
sudo ufw allow 9929/udp comment 'Wireguard'
Now start the tunnel on the VPS:
# Enable and start the tunnel
sudo systemctl enable --now wg-quick@wg0

# Verify that the tunnel is up
sudo wg show
sudo systemctl status wg-quick@wg0
Client configuration
The Platypush machine now needs a configuration that points back to the VPS.
Run the following commands on your Platypush machine:
SERVER_PUBLIC_KEY="<The public key of the server>"
SERVER_ENDPOINT="<The public IP or DNS name of the server>"
CLIENT_PRIVATE_KEY="$(sudo cat /etc/wireguard/private.key)"

sudo tee /etc/wireguard/wg0.conf > /dev/null <<EOF
[Interface]
PrivateKey = ${CLIENT_PRIVATE_KEY}
Address = 10.0.0.2/32

[Peer]
PublicKey = ${SERVER_PUBLIC_KEY}
AllowedIPs = 10.0.0.1/32
Endpoint = ${SERVER_ENDPOINT}:9929
PersistentKeepalive = 25
EOF

unset CLIENT_PRIVATE_KEY
sudo chmod 600 /etc/wireguard/wg0.conf

sudo systemctl enable --now wg-quick@wg0

# Verify the tunnel and the route to the reverse proxy.
sudo wg show
ping -c 3 10.0.0.1
AllowedIPs = 10.0.0.1/32 keeps the client configuration narrow: only traffic for the VPN address of the reverse proxy goes through this tunnel. PersistentKeepalive = 25 is useful when the Platypush machine is behind a home router or mobile NAT, because it keeps the tunnel mapping alive so the reverse proxy can reach 10.0.0.2:8008.
Once the client is up, verify from the VPS that the reverse proxy can reach the Platypush Web service through the tunnel:
ping -c 3 10.0.0.2
curl -I http://10.0.0.2:8008/
Reverse proxy
Assuming that these conditions are met, proceed with creating a reverse proxy configuration for the Platypush Web interface:
upstream platypush-weather {
  # Or just 127.0.0.1:8008 if the Platypush service runs on the same box
  server 10.0.0.2:8008;
}

server {
  # Replace with your own domain
  # NOTE: The DNS entry of this domain must point to the reverse proxy
  server_name weather.platypush.example.com;
  listen 80;

  # Standard HTTP resources
  location / {
      client_max_body_size 5M;
      proxy_read_timeout 60;
      proxy_connect_timeout 60;
      proxy_set_header Host $http_host;
      proxy_set_header X-Real-IP $remote_addr;
      proxy_set_header X-Forwarded-Ssl on;
      proxy_set_header X-Forwarded-For $proxy_add_x_forwarded_for;
      proxy_pass http://platypush-weather;
  }

  # WebSockets
  location /ws/ {
      client_max_body_size 5M;
      proxy_set_header Upgrade $http_upgrade;
      proxy_set_header Connection "upgrade";
      proxy_redirect off;
      proxy_http_version 1.1;
      proxy_set_header Host $http_host;
      proxy_pass http://platypush-weather;
  }
}
Apply the configuration and reload your reverse proxy:
sudo nginx -t
sudo nginx -s reload
Then verify that the reverse proxy can reach the Platypush Web service through the tunnel:
curl -I http://weather.platypush.example.com/
Generate a certificate
Run the following commands on your reverse proxy machine:
sudo certbot --nginx -d weather.platypush.example.com
Then verify that the reverse proxy can reach the Platypush Web service through the tunnel over HTTPS:
curl -I https://weather.platypush.example.com/
Installing the mobile app
Open https://<weather.platypush.example.com>/plugin/weather.openweathermap from your browser on a mobile device.
Tap on your browser's menu. You should see an entry like "Add to Home Screen" or "Install app".
Select to install the app and add it to your home screen.
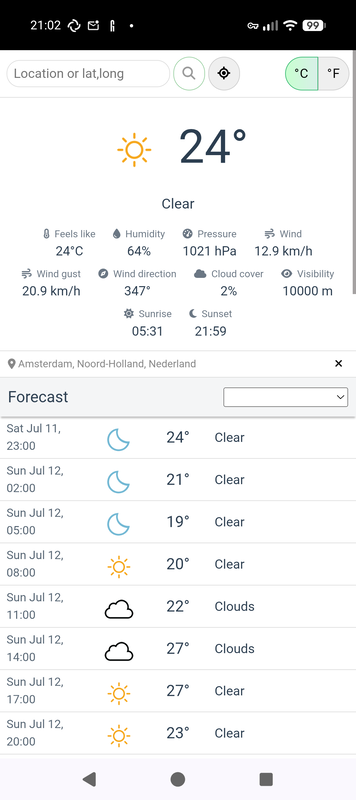
You can search for other locations directly in the search bar, or use the GPS button to find your current location.
The GPS access permissions are optional, they are requested directly in your browser and only when you use the app, and there's nothing monitoring your location in the background (unless you actually want to monitor it explicitly).
[Optional] Handling weather events
If you only need a weather app that works on desktop and mobile when you want to check it, then you can skip this section.
If instead you would also like to handle events from the weather service, then you can create Platypush event hooks to handle NewWeatherConditionEvent.
Every time the Platypush service processed a weather update, it will emit events with the following payload:
{
  "type": "event",
  "target": "WeatherApp",
  "origin": "WeatherApp",
  "id": "f7c26249a0b4eec5c04831fbfe11cdcd",
  "args": {
    "type": "platypush.message.event.weather.NewWeatherConditionEvent",
    "plugin_name": "weather.openweathermap",
    "summary": "Clear",
    "icon": "01d",
    "precip_intensity": 0,
    "precip_type": null,
    "temperature": 25.46,
    "apparent_temperature": 25.81,
    "humidity": 67,
    "pressure": 1020,
    "wind_speed": 3.58,
    "wind_gust": 6.71,
    "wind_direction": 344,
    "cloud_cover": 5,
    "visibility": 10000.0,
    "sunrise": "2026-07-11T03:31:24+00:00",
    "sunset": "2026-07-11T19:59:52+00:00",
    "units": "metric",
    "time": "2026-07-11T18:52:05"
  }
}
Values:
temperature: temperature in degrees Celsius (ifunits: metric) or degrees Fahrenheit (ifunits: imperial)apparent_temperature: apparent temperature in degrees Celsius (ifunits: metric) or degrees Fahrenheit (ifunits: imperial)wind_speed: wind speed in meters per secondwind_gust: wind gust in meters per secondvisibility: visibility in meterspressure: pressure in hPacloud_cover: cloud cover in percentage (0-100)precip_intensity: precipitation intensity in mm/hprecip_type: rain, snow or hail
You can subscribe to these events, for example, for:
- Sending a notification to your mobile when it starts raining
- Sending an alert on an XMPP or Matrix channel if the visibility drops below a certain threshold
- Sending a message to your family's messaging group if it starts snowing in your area
- Storing the weather data in a database for later analysis
ntfy
We'll use ntfy to send notifications to your mobile device, paired with the Platypush ntfy plugin.
You can install the Android (F-Droid link) or iOS app to receive notifications on your mobile device.
By default, the app and the Platypush plugin will connect to the default ntfy server (https://ntfy.sh/app).
That's an option, but in that case make sure to always use authentication or topic names with randomized strings.
Otherwise, you can run your own ntfy instance to send and receive your notifications on a fully self-hosted setup.
The easiest way is perhaps through Docker:
docker run \
  -v /your/ntfy/config:/etc/ntfy \
  -v /your/ntfy/cache:/var/cache/ntfy \
  -p 8080:80 \
  -it \
  binwiederhier/ntfy \
      serve \
      --cache-file /var/cache/ntfy/cache.db
Then create a reverse proxy configuration with a certificate like shown in Reverse proxy configuration.
Plugin configuration
Add the ntfy plugin to your config.yaml file for Platypush:
ntfy:
  # Optional, if using a custom server, otherwise ntfy.sh is used
  # server_url: https://ntfy.example.com
Notifying of precipitation events
Create a Platypush event hook to send notifications to your mobile device:
# Content of /your/platypush/config/scripts/weather_notifications.py

import json
from functools import wraps
from time import time

from platypush import Variable, cron, run
from platypush.events.weather import NewWeatherConditionEvent

# The weather notifications topic. Replace `1234` with a random string
weather_notifications_topic = "weather-notifications-1234"

# A Platypush variable to persist the last weather notification timestamp
last_weather_state_notification_timestamp = Variable(
    "LAST_WEATHER_STATE_NOTIFICATION_TIMESTAMP"
)

# A Platypush variable to persist the latest notified weather state,
# so notifications will be delivered when the state changes, even if
# they are within the `weather_state_notification_timeout`
last_notified_weather_state = Variable("LAST_NOTIFIED_WEATHER_STATE")

# The maximum time between weather notifications
weather_state_notification_timeout = (
    60 * 60 * 60  # At most one weather notification every 30 minutes
)


def notification_throttled(func):
    """
    Prevents the decorated function from running too often, unless the
    weather state has changed since the last notification.
    """

    @wraps(func)
    def wrapper(*args, **kwargs):
        event = args[0]
        weather_state = json.dumps(event.args, sort_keys=True)
        last_weather_state = last_notified_weather_state.get()
        notification_is_throttled = (
            time() - float(last_weather_state_notification_timestamp.get() or 0)
            <= weather_state_notification_timeout
        )

        if notification_is_throttled and weather_state == last_weather_state:
            return

        result = func(*args, **kwargs)
        last_weather_state_notification_timestamp.set(time())
        last_notified_weather_state.set(weather_state)
        return result

    return wrapper


def precipitation_notification(event: NewWeatherConditionEvent) -> dict | None:
    """
    Returns a notification about precipitation for ntfy, if any.
    """

    if (event.precip_intensity or 0) < 0.1:
        return  # Negligible or absent precipitation

    precip_type = (event.precip_type or "rain").lower()
    if event.precip_intensity < 2:
        precip_intensity = "light"
        priority = 2
    elif event.precip_intensity < 5:
        precip_intensity = "moderate"
        priority = 3
    else:
        precip_intensity = "heavy"
        priority = 4

    if precip_type == "snow":
        precip_icon = "❄️"
    elif precip_type == "hail":
        precip_icon = "🌧️"
    else:
        precip_icon = "💧"

    run(
        "ntfy.send_message",
        topic=weather_notifications_topic,
    )

    return {
        "title": f"{precip_icon} Weather update",
        "message": f"{precip_intensity.capitalize()} {precip_type} in your area",
        "priority": priority,
    }


@hook(NewWeatherConditionEvent)
@notification_throttled
def on_weather_update(event: NewWeatherConditionEvent, *_, **__):
    precip = precipitation_notification(event)
    if precip:
        run(
            "ntfy.send_message",
            topic=weather_notifications_topic,
            **precip,
        )
Then install the ntfy app on your mobile device or use the Web interface, and subscribe to the weather-notifications-1234 topic on the configured server.
You'll be notified whenever there's precipitation in your area.
Of course, you can modify your hook to deliver any kind of relevant notifications in your area - about wind, temperature, humidity, etc.
And actions are not limited to ntfy. If you prefer, you can deliver the notification over email, ActivityPub, Matrix, Telegram, SMS, XMPP or anything that has a Platypush plugin.
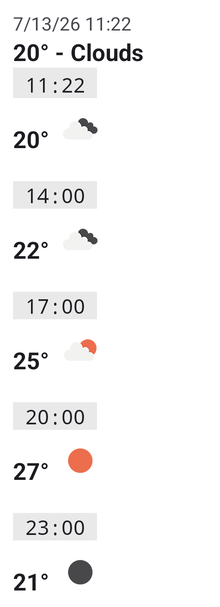
Weather summaries
Another useful feature of many mainstream weather apps is that of a daily summary (usually in the morning) of the weather in a certain location, so you can plan your day accordingly.
This can be easily achieved too through a Platypush cronjob.
# Content of /your/platypush/config/scripts/weather_report.py

from datetime import datetime

from platypush import cron, procedure, run

weather_plugin = "weather.openweathermap"

# The weather notifications topic. Replace `1234` with a random string
weather_notifications_topic = "weather-notifications-1234"


@procedure("deliver_weather_report")
def deliver_weather_report():
    """
    Procedure that sends a weather report to ntfy.
    """

    forecast = [
        {
            "icon": weather["icon"],
            "temperature": weather["temperature"],
            "summary": weather["summary"],
            "time": weather["time"],
        }
        for weather in run(f"{weather_plugin}.get_forecast")
        if datetime.fromisoformat(weather["time"]).day == datetime.now().day
    ]

    current_weather = {
        "time": datetime.now().isoformat(),
        **run(f"{weather_plugin}.get_current_weather"),
    }

    body = ""
    for forecast_entry in [current_weather, *forecast]:
        body += (
            f"`{datetime.fromisoformat(forecast_entry['time']).strftime('%H:%M')}`\n"
            f"**{round(forecast_entry['temperature'])}°** "
            f"![{forecast_entry['summary']}](https://openweathermap.org/payload/api/media/file/{forecast_entry['icon']}.png)\n\n"
        )

    run(
        "ntfy.send_message",
        topic=weather_notifications_topic,
        title=f"{round(current_weather['temperature'])}° - {current_weather['summary']}",
        message=body,
        icon=f"https://openweathermap.org/payload/api/media/file/{current_weather['icon']}.png",
        markdown=True,
    )


@cron("0 6 * * *")
def daily_weather_report():
    """
    Run the `deliver_weather_report` procedure every day at 6 AM.
    """
    run("procedure.deliver_weather_report")
Restart the Platypush service, and every day at 6 AM, you'll get a summary of the weather in your area.
[Optional] Voice Assistant
A common use-case for voice assistant is to ask information about the weather, and Platypush can cover that too by running a voice assistant directly on your hardware.
The linked article describes how to run a fully local voice assistant, with local speech-to-text and text-to-speech engines.
But things also work if you decide to use remote models through the assistant.openai or tts.openai plugins.
You can use the assistant-sample repository to quickly get started with a Docker image with a Platypush installation configured to run a voice assistant.
Some sample configuration, using assistant.openwakeword for hotword detection together with assistant.openai and tts.openai:
assistant.openwakeword:
  detection_sensitivity: 0.3
  models:
    - alexa

openai:
  model: gpt-5.5
  api_key: <YOUR-OPENAI-API-KEY>

assistant.openai:
  tts_plugin: tts.openai
  conversation_start_sound: /usr/share/sounds/assistant.mp3
  input_volume: 110

tts.openai:
  output_volume: 85
You can then add a script with an event hook on SpeechRecognizedEvent and reacts to weather requests:
# Content of /your/platypush/config/scripts/weather_assistant.py

import json
from dataclasses import dataclass
from datetime import datetime
from time import time

import requests

from platypush import Config, run, __version__ as platypush_version
from platypush.events.assistant import (
    HotwordDetectedEvent,
    SpeechRecognizedEvent,
)

ai_plugin = "openai"
assistant_plugin = "assistant.openai"
weather_plugin = "weather.openweathermap"
location_cache: dict[str, tuple[float, float]] = {}


@dataclass
class DefaultLocation:
    """
    A utility class to automatically and lazy manage the default weather
    location.
    """
    _location: str | None = None

    @property
    def name(self) -> str | None:
        if self._location:
            return self._location

        # Get the weather plugin configuration
        cfg = Config.get().get(weather_plugin)
        if not cfg:
            return None

        lat = cfg.get("lat")
        long = cfg.get("long")
        location = cfg.get("location")

        # If a location name is configured, use that
        if location:
            return location

        # Otherwise, reverse lookup the location from latitude and longitude
        self._location = (
            run(f"{weather_plugin}.reverse_lookup_location", lat=lat, long=long) or {}
        ).get("name")

        return self._location


default_location = DefaultLocation()


@dataclass
class WeatherRequest:
    """
    A weather forecast request.
    """

    location: str
    delta_days: int

    def __post_init__(self):
        if self.delta_days < 0:
            raise ValueError("delta_days must be positive")

    def get_location_coords(self) -> tuple[float, float] | None:
        """
        Get the coordinates of the location.
        """

        # Cache lookup
        coord = location_cache.get(self.location)
        if coord:
            return coord

        # Reverse geo lookup
        response = requests.get(
            f"https://nominatim.openstreetmap.org/search?q={self.location}&format=json&limit=1",
            headers={
                "User-Agent": (
                    f"Mozilla/5.0 (compatible; Platypush/{platypush_version}; "
                    "+https://git.platypush.tech/platypush/platypush)"
                ),
            },
            timeout=10,
        )

        response.raise_for_status()
        geojson = response.json() or []
        if not geojson:
            return None

        lat, lng = (geojson[0] or {}).get("lat"), (geojson[0] or {}).get("lon")
        if not (lat and lng):
            return None

        location_cache[self.location] = lat, lng
        return lat, lng

    def get_time_range(self) -> tuple[datetime, datetime]:
        return (
            datetime.fromtimestamp(time() + self.delta_days * 24 * 60 * 60),
            datetime.fromtimestamp(time() + (self.delta_days + 1) * 24 * 60 * 60),
        )


def get_structured_weather_forecast(prompt: str) -> dict:
    """
    Get a structured weather forecast given a free text prompt.
    """

    # Parse the free-text request
    request = parse_weather_request(prompt)
    response: dict = {}

    if not request:
        return response

    # Retrive the location for the weather request
    coord = request.get_location_coords()
    if not coord:
        return response

    # Get the weather forecast for the specified location and time frame
    lat, lng = coord
    time_range = request.get_time_range()
    forecast = [
        {
            "location": request.location,
            **weather,
        }
        for weather in run(
            f"{weather_plugin}.get_forecast",
            lat=lat,
            long=lng,
        )
        if time_range[0] <= datetime.fromisoformat(weather["time"]) <= time_range[1]
    ]

    # If the user requested the current weather, add it to the response
    is_today_forecast = request.delta_days == 0
    current_weather = None
    if is_today_forecast:
        current_weather = forecast[0]

    if current_weather:
        response["now"] = current_weather

    # Construct the response
    if is_today_forecast:
        key = "today"
    elif request.delta_days == 1:
        key = "tomorrow"
    else:
        key = f"{request.delta_days}days"

    response[key] = forecast
    return response


def parse_weather_request(request: str) -> WeatherRequest | None:
    """
    Parse a weather request given a free text prompt.
    """

    # Use the OpenAI plugin to parse the free-text user request into a
    # structured request
    request_dict = (
        run(
            f"{ai_plugin}.get_response",
            context=[
                {
                    "role": "system",
                    "content": (
                        "You are a voice assistant provided with weather requests as free text.\n"
                        "Given the prompt, return a structured JSON representation of the request in the following format: "
                        '{ "type": "weather", "delta_days": 1, "location": "San Francisco" }, '
                        'where both delta_days and location are optional (e.g. if the user simply asks "How\'s the weather?".\n'
                        'If the prompt doesn\'t seem to contain a weather request, return { "type": null }'
                    ),
                }
            ],
            prompt=request,
        )
        or {}
    )

    if request_dict.get("type") != "weather":
        return None

    weather_request = WeatherRequest(
        location=request_dict.get("location", default_location.name),
        delta_days=request_dict.get("delta_days", 0),
    )

    return weather_request


def get_weather_report(user_request: str) -> str | None:
    """
    Get a weather free-text report given a free text prompt.
    """

    structured_response = get_structured_weather_forecast(user_request)
    response = None

    if structured_response:
        # Use the OpenAI plugin to translate the structured weather forecast
        # response into a free-text report
        response = run(
            f"{ai_plugin}.get_response",
            prompt=json.dumps(structured_response),
            context=[
                # General weather assistant system prompt
                {
                    "role": "system",
                    "content": (
                        "You are a weather voice assistant that translates JSON weather reports "
                        "into more informal weather reports. The output reports should be brief and to the "
                        "point, but not miss relevant details from the original report."
                    ),
                },
                # JSON structure system prompt
                {
                    "role": "system",
                    "content": (
                        "If the JSON report contains a 'now' key, that's the current weather. "
                        "Otherwise, it may contain either 'today', 'tomorrow' or '<n>days' in the future. "
                    ),
                },
                # Avoid abbreviations
                {
                    "role": "system",
                    "content": (
                        "Do not use abbreviations in your output text, always use the full text units. "
                        "Also, strip any Markdown formatting from the output text. "
                        "Keep in mind that your output text will be rendered verbatim by a text-to-speech engine."
                    ),
                },
                # Degrees and wind speed system prompt
                {
                    "role": "system",
                    "content": (
                        "Do not say 'Celsius' or 'Fahreneit', only 'degrees'. "
                        "Wind speed is reported in km/h, but don't report the absolute number - "
                        "just if the wind is absent, weak, medium or strong."
                    ),
                },
                # Precipitation system prompt
                {
                    "role": "system",
                    "content": (
                        "Precipitation intensity is expressed in mm/h. Do not report the absolute number. "
                        "Only say if the precipitation is low, medium, high or very intense. "
                        "If absent, don't say anything about precipitations. "
                        "Otherwise, mention the precipitation type too (rain, snow, hail...). "
                        "If any precipitations are present in the forecast, mention their intensity and "
                        "around what time of the day they will happen."
                    ),
                },
                # Cloud cover system prompt
                {
                    "role": "system",
                    "content": (
                        "Cloud cover is reported as a percentage between 0 and 100. "
                        "Do not report the absolute number - only a description of the cloud cover. "
                        "In the forecast, mention a cloud cover description that matches a reasonable average among the data points."
                    ),
                },
            ],
        )

    return response


@when(HotwordDetectedEvent)
def on_hotword_detected():
    """
    Start the conversation when the hotword is detected.
    """
    run(f"{assistant_plugin}.start_conversation")


@when(SpeechRecognizedEvent, phrase=".*weather.*")
def on_weather_request(event):
    """
    Respond to weather requests by intercepting `SpeechRecognizedEvent` events
    that contain a weather request (regex).
    """
    response = (
        get_weather_report(event.phrase) or
        "Sorry, I couldn't find any weather information for that location."
    )

    event.assistant.render_response(response)
Voice weather assistant flow
A full demo of how it looks and sounds like: